TensorFlow(2) Classifier

tensorflowのClassifier(分類器)を作ってみると思った。

Contents

調査

まず調査

分類したいものを集め

分類器を訓練

分類器の実装

まとめ

参考

  1. https://qiita.com/NoriakiOshita/items/4f20114ee7d3713b345f — TensorFlowでうなぎと寿司を判定するAndroidアプリを作ってみた.
  2. https://qiita.com/believe2200/items/c4858507f9d270797666 — 機械学習でイケメン(ブサメン)判定アプリを作ってみる。
  3. http://nilhcem.com/android/custom-tensorflow-classifier – Android – Add some machine learning to your apps, with TensorFlow

RPi:scikit-learn(2) 線形サポートベクトルマシン

下記のBB本の続きだが、

カラー図解 Raspberry Piではじめる機械学習 基礎からディープラーニングまで

Google Colaboratory環境は、Piとほぼ同じとわかったので、これからの実験はGoogle Colaboratoryで行う。

線形サポートベクトルマシンのコードがよくわからないので、そのままコピペ

# -*- coding: utf-8 -*-
from sklearn import datasets, svm
import numpy as np
import matplotlib.pyplot as plt
from matplotlib.colors import ListedColormap

# アヤメのデータをロードし、変数irisに格納
iris = datasets.load_iris()

# 特徴量のセットを変数Xに、ターゲットを変数yに格納
X = iris.data
y = iris.target

# 特徴量を外花被片の長さ(sepal length)と幅(sepal width)の
# 2つのみに制限(2次元で考えるため)
X = X[:,:2]

# ターゲットは2 (iris virginica) でないもの, 
# つまり iris setosa (0) と iris versicolor (1) のみを対象とする
# (領域の2分割)
X = X[y!=2]
y = y[y!=2]

# 分類用にサポートベクトルマシン (Support Vector Classifier) を用意
clf = svm.SVC(C=1.0, kernel='linear')
# データに最適化
clf.fit(X, y)

##### 分類結果を背景の色分けにより表示

# 外花被片の長さ(sepal length)と幅(sepal width)の
# 最小値と最大値からそれぞれ1ずつ広げた領域を
# グラフ表示エリアとする
x_min = min(X[:,0]) - 1
x_max = max(X[:,0]) + 1
y_min = min(X[:,1]) - 1
y_max = max(X[:,1]) + 1

# グラフ表示エリアを縦横500ずつのグリッドに区切る
# (分類クラスに応じて背景に色を塗るため)
XX, YY = np.mgrid[x_min:x_max:500j, y_min:y_max:500j]

# グリッドの点をscikit-learn用の入力に並べなおす
Xg = np.c_[XX.ravel(), YY.ravel()]

# 各グリッドの点が属するクラス(0か1)の予測をZに格納
Z = clf.predict(Xg)

# Zをグリッド上に並べなおす
Z = Z.reshape(XX.shape)

# クラス0 (iris setosa) が薄オレンジ (1, 0.93, 0.5, 1)
# クラス1 (iris versicolor) が薄青 (0.5, 1, 1, 1)
cmap01 = ListedColormap([(0.5, 1, 1, 1), (1, 0.93, 0.5, 1)])

# 背景の色を表示
plt.pcolormesh(XX, YY, Z==0, cmap=cmap01)

# 軸ラベルを設定
plt.xlabel('sepal length')
plt.ylabel('sepal width')

##### ターゲットに応じた色付きでデータ点を表示

# iris setosa (y=0) のデータのみを取り出す
Xc0 = X[y==0]
# iris versicolor (y=1) のデータのみを取り出す
Xc1 = X[y==1]

# iris setosa のデータXc0をプロット
plt.scatter(Xc0[:,0], Xc0[:,1], c='#E69F00', linewidths=0.5, edgecolors='black')
# iris versicolor のデータXc1をプロット
plt.scatter(Xc1[:,0], Xc1[:,1], c='#56B4E9', linewidths=0.5, edgecolors='black')

# サポートベクトルを取得
SV = clf.support_vectors_
# サポートベクトルの点に対し、赤い枠線を表示
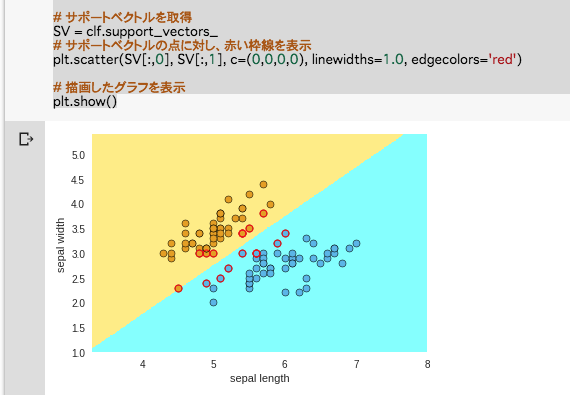
plt.scatter(SV[:,0], SV[:,1], c=(0,0,0,0), linewidths=1.0, edgecolors='red')

# 描画したグラフを表示
plt.show()

結果の出力

Colab(2) Pip List

Machine Learning に使うライブラリを確認するため、OSのコマンドラインに命令を送る。

!pip list

ずらずら出てきた。かなり長い。

Package                            Version    
---------------------------------- -----------
absl-py                            0.5.0      
altair                             2.2.2      
astor                              0.7.1      
backports-abc                      0.5        
backports.functools-lru-cache      1.5        
backports.shutil-get-terminal-size 1.0.0      
backports.weakref                  1.0.post1  
beautifulsoup4                     4.6.3      
bleach                             3.0.2      
cachetools                         2.1.0      
certifi                            2018.10.15 
chardet                            3.0.4      
configparser                       3.5.0      
crcmod                             1.7        
cycler                             0.10.0     
cymem                              2.0.2      
cytoolz                            0.9.0.1    
decorator                          4.3.0      
defusedxml                         0.5.0      
dill                               0.2.8.2    
entrypoints                        0.2.3      
enum34                             1.1.6      
funcsigs                           1.0.2      
functools32                        3.2.3.post2
future                             0.16.0     
futures                            3.2.0      
gast                               0.2.0      
google-api-core                    1.5.0      
google-api-python-client           1.6.7      
google-auth                        1.4.2      
google-auth-httplib2               0.0.3      
google-auth-oauthlib               0.2.0      
google-cloud-bigquery              1.1.0      
google-cloud-core                  0.28.1     
google-cloud-language              1.0.2      
google-cloud-storage               1.8.0      
google-cloud-translate             1.3.1      
google-colab                       0.0.1a1    
google-resumable-media             0.3.1      
googleapis-common-protos           1.5.3      
grpcio                             1.15.0     
h5py                               2.8.0      
httplib2                           0.11.3     
idna                               2.6        
ipykernel                          4.6.1      
ipython                            5.5.0      
ipython-genutils                   0.2.0      
Jinja2                             2.10       
joblib                             0.12.5     
jsonschema                         2.6.0      
jupyter-client                     5.2.3      
jupyter-core                       4.4.0      
Keras                              2.1.6      
Keras-Applications                 1.0.6      
Keras-Preprocessing                1.0.5      
Markdown                           3.0.1      
MarkupSafe                         1.0        
matplotlib                         2.1.2      
mistune                            0.8.4      
mock                               2.0.0      
mpmath                             1.0.0      
msgpack                            0.5.6      
msgpack-numpy                      0.4.3.2    
murmurhash                         1.0.1      
nbconvert                          5.4.0      
nbformat                           4.4.0      
networkx                           2.2        
nltk                               3.2.5      
notebook                           5.2.2      
numpy                              1.14.6     
oauth2client                       4.1.3      
oauthlib                           2.1.0      
olefile                            0.46       
opencv-python                      3.4.3.18   
pandas                             0.22.0     
pandas-gbq                         0.4.1      
pandocfilters                      1.4.2      
pathlib                            1.0.1      
pathlib2                           2.3.2      
patsy                              0.5.0      
pbr                                5.0.0      
pexpect                            4.6.0      
pickleshare                        0.7.5      
Pillow                             4.0.0      
pip                                18.1       
plac                               0.9.6      
plotly                             1.12.12    
portpicker                         1.2.0      
preshed                            2.0.1      
prompt-toolkit                     1.0.15     
protobuf                           3.6.1      
psutil                             5.4.7      
ptyprocess                         0.6.0      
pyasn1                             0.4.4      
pyasn1-modules                     0.2.2      
Pygments                           2.1.3      
pymc3                              3.5        
pyparsing                          2.2.2      
pystache                           0.5.4      
python-dateutil                    2.5.3      
pytz                               2018.5     
PyWavelets                         1.0.1      
PyYAML                             3.13       
pyzmq                              16.0.4     
regex                              2018.1.10  
requests                           2.18.4     
requests-oauthlib                  1.0.0      
rsa                                4.0        
scandir                            1.9.0      
scikit-image                       0.13.1     
scikit-learn                       0.19.2     
scipy                              0.19.1     
seaborn                            0.7.1      
setuptools                         40.4.3     
simplegeneric                      0.8.1      
singledispatch                     3.4.0.3    
six                                1.11.0     
spacy                              2.0.16     
statsmodels                        0.8.0      
subprocess32                       3.5.3      
sympy                              1.1.1      
tensorboard                        1.11.0     
tensorflow                         1.12.0rc1  
tensorflow-hub                     0.1.1      
termcolor                          1.1.0      
terminado                          0.8.1      
testpath                           0.4.2      
Theano                             1.0.3      
thinc                              6.12.0     
toolz                              0.9.0      
tornado                            4.5.3      
tqdm                               4.27.0     
traitlets                          4.3.2      
typing                             3.6.6      
ujson                              1.35       
uritemplate                        3.0.0      
urllib3                            1.22       
vega-datasets                      0.5.0      
wcwidth                            0.1.7      
webencodings                       0.5.1      
Werkzeug                           0.14.1     
wheel                              0.32.1     
wrapt                              1.10.11    
xgboost                            0.7.post4  

Blue Book の機械学習のRaspberry Piの環境と比べると、ほぼ同じといえる。

こちらでBlue Book の機械学習をやってみる。

カラー図解 Raspberry Piではじめる機械学習 基礎からディープラーニングまで (ブルーバックス)

新品価格
¥1,760から
(2020/7/17 13:56時点)

Colab(5) use OpenCV

「参考1」のコードはほぼ同じでできた。

Contents

コード

下記のコードをGoogle Colaboratoryにコピペ、lena_std.tifのファイルは別途用意する。

%matplotlib inline
import cv2 # opencvのインポート
import matplotlib.pyplot as plt # matplotlib(描画用)

print(cv2.__version__)


from google.colab import files #
f = files.upload() #ファイルアップロード


img=cv2.imread("./lena_std.tif")

show_img = cv2.cvtColor(img, cv2.COLOR_BGR2RGB)
plt.imshow(show_img) #表示

lena_std.tifというファイルをアップロードして、imreadで読み込んで、plt.imshowで表示する。
(表示の前に、BGRをRGBに変換)。

参考

  1. https://qiita.com/kouki_outstand/items/ec1024cf0517f686ed7b


Colab(1) Getting start

Google ColaboratoryはGoogleが機械学習の教育や研究用に提供しているツールである、Jupyter Notebook環境が無償で!使うことができる。

Contents

Google Colaboratoryとは

Colaboratory は、完全にクラウドで実行される Jupyter ノートブック環境です。設定不要で、無料でご利用になれます。Colaboratory を使用すると、コードの記述と実行、解析の保存や共有、強力なコンピューティング リソースへのアクセスなどをブラウザからすべて無料で行えます。

Google Colaboratoryの起動

Google Colaboratoryにブラウザでアクセスするだけ

リソースの確認

ノートブックを新規作成 > PYTHON 2の新しいノートブック または, PYTHON 3の新しいノートブック を選択

“!”をつけることで、Linuxのコマンドを実行することができます。
コードセルを追加し

!cat /proc/cpuinfo

長い出力を確認してください。

仮想マシンタイプスペック

Google Colaboratoryの仮想マシンタイプスペックの例:

  • n1-highmem-2 instance
  • Ubuntu 18.04
  • 2vCPU @ 2.2GHz
  • 13GB RAM
  • (GPUなし/ TPU)40GB, (GPUあり)360GB Storage
  • GPU NVIDIA Tesla K80 12GB
  • アイドル状態が90分続くと停止
  • 連続使用は最大12時間
  • Notebookサイズは最大20MB

複数のマシンのブラウザから開けるので、ペア・プログラミングが便利かも。


RPi:scikit-learn(1) Install

機械学習入門に、環境構築は手間がとるので、下記の本を参考に、Raspberry Piではじめる。

カラー図解 Raspberry Piではじめる機械学習 基礎からディープラーニングまで


カラー図解 Raspberry Piではじめる機械学習 基礎からディープラーニングまで (ブルーバックス)

新品価格
¥1,760から
(2020/7/17 13:56時点)

Contents

scikit-learn のインストール

分類や予測のためのモデルが詰まった機械学習用パッケージです。
Pythonでのデータ分析ではほぼデファクトと言っても良い地位を得ています。

$ sudo apt update

$ sudo apt install python-sklearn


機械学習関連バージョン確認

プログラムは、下記の書籍付録サイトからダウンロードしてください。

http://bluebacks.kodansha.co.jp/special/ml.html

次のコマンドを実行する

$ python ml-03-01-version.py

Raspberry Pi3の結果

???


Ubuntu 16.04環境下の出力、Piより古いとわかった。

# python ml-03-01-version.py
scikit-learnのバージョンは0.17です
numpyのバージョンは1.11.0です
scipyのバージョンは0.17.0です
matplotlibのバージョンは1.5.1です
PIL(Pillow)のバージョンは3.1.2です
kerasがインストールされていないか、まだ設定が済んでいません
theanoはインストールされていません
root@jupiter:~/mlbb# ^C
root@jupiter:~/mlbb#

Google Colaboratory環境下の出力、Piより新しいとわかった。

Using TensorFlow backend.
scikit-learnのバージョンは0.19.2です
numpyのバージョンは1.14.6です
scipyのバージョンは0.19.1です
matplotlibのバージョンは2.1.2です
PIL(Pillow)のバージョンは4.0.0です
kerasのバージョンは2.1.6です
theanoのバージョンは1.0.3です


参考


TensorFlow(1) Install

TensorFlowは、分散学習をサポートしているGoogle製の実績あるディープラーニングライブラリ。

Contents

pyenvの環境構築

pyenvは、複数のPythonのバージョンを管理できるコマンドラインツール、特定バージョンしか正しく動かないて、環境構築に苦労することは、コレて解決!

Mac OS

$ brew install pyenv

Ubuntu

まず必要なパッケージをインストールする必要。

$ sudo apt-get update
$ sudo apt-get install -y git build-essential libssl-dev language-pack-id


pyenvのレポジトリから、ホームディレクトリ下の.pyenvディレクトリにクローン。

$ git clone https://github.com/yyuu/pyenv.git ~/.pyenv

こうすることで、$HOME/.pyenvにレポジトリがクローンされる。

では、次にpyenvに必要な環境変数を設定していきましょう。今後もシェルの起動時に環境変数が設定されるように~/.bash_profile~/.bashrc * などのシェルの設定ファイルに以下のコマンドで変数定義のコードを追加。

$ echo 'export PYENV_ROOT="$HOME/.pyenv"' >> ~/.bashrc
$ echo 'export PATH="$PYENV_ROOT/bin:$PATH"' >> ~/.bashrc
$ echo 'eval "$(pyenv init -)"' >> ~/.bashrc

* シェルの環境がbashではなく、zshであれば~/.zshrcなど環境に合わせて設定ファイルが違うので注意しましょう。

設定ファイルを再読込するためにも、シェルを再起動。

$ exec $SHELL


pipでTensorFlowをインストール

TensorFlowをpipを使ってインストールする場合は、pipのバージョンが8.1以上である必要があるので、まずは念のためpipを最新バージョンにアップグレードしておきましょう。

$ pip install --upgrade pip

CPU版

CPU版は以下のコマンドでインストールすること。

$ pip install tensorflow

GPU版

GPUをサポートするバージョンは、以下のコマンドでインストールしましょう。

$ pip install tensorflow-gpu

動作確認

きちんとインストールされているか確かめるために、Pythonのインタラクティブシェルから動作確認をしてみましょう。

$ python
Python 3.5.2 (default, Oct 20 2018, 12:09:22) 
[GCC 5.4.0 20160609] on linux
Type "help", "copyright", "credits" or "license" for more information.
>>> import tensorflow as tf
>>> hello = tf.constant('Hello, TensorFlow!')
>>> sess = tf.Session()
2018-10-20 12:16:21.214705: I tensorflow/core/platform/cpu_feature_guard.cc:141] Your CPU supports instructions that this TensorFlow binary was not compiled to use: AVX2 FMA
>>> print(sess.run(hello))
b'Hello, TensorFlow!'
>>>       

CPU supportsとかのメッセージ表示され、問題がないよう、無事にコンソールにb'Hello, TensorFlow!'と表示された。

参考

  1. https://deepage.net/tensorflow/2017/01/17/how-to-install-tensorflow.html — 機械学習の初心者でもすぐに出来るTensorFlowのインストール方法

Caffe(1) install

画像認識に定評のあるライブラリ・Caffeを使ってみたくなり、caffeを導入してみる。

Contents

Caffeとは

CAFFE(Convolutional Architecture for Fast Feature Embedding)は、カリフォルニア大学バークレー校で開発されたディープラーニングのフレームワークである。オープンソースのソフトウェアであり、BSDライセンスの元に公開されている[4]。ソースコードはC++で書かれており、Pythonインターフェイスが存在する[5]。

2017年4月、FacebookはCaffe2を発表した[11]。Caffe2には回帰型ニューラルネットワークなどの新機能が含まれている。2018年3月、Caffe2はPyTorchにマージされた[12]。

(wikipedia)

Caffe導入

Macでのcaffe導入は難しく挫折したので、UbuntuでCaffeを導入。Ubuntuの最新版18.04実機でも挫折した。チュートリアルによくある16.04を探しで導入してみることになる。

クラウドサーバなら、気軽にいろいろバージョンのOSを試せるので、この機にAlibaba Cloudを試す。

Caffeのインストールその1

まず「参考1」を見ながら、インストール

$ sudo apt-get install libatlas-base-dev libprotobuf-dev libleveldb-dev libsnappy-dev libopencv-dev libboost-all-dev libhdf5-serial-dev libgflags-dev libgoogle-glog-dev liblmdb-dev protobuf-compiler git

gitからCaffeのソースをダウンロードします。

$ git clone https://github.com/BVLC/caffe.git

いきなりmake

root@jupiter:~# cd caffe/
root@jupiter:~/caffe# make
Makefile:6: *** Makefile.config not found. See Makefile.config.example..  Stop.
root@jupiter:~/caffe# cp Makefile.config.example Makefile.config
設定ファイルがないね。作る。
root@jupiter:~/caffe# make
PROTOC src/caffe/proto/caffe.proto
CXX .build_release/src/caffe/proto/caffe.pb.cc
CXX src/caffe/common.cpp
In file included from ./include/caffe/common.hpp:19:0,
                 from src/caffe/common.cpp:7:
./include/caffe/util/device_alternate.hpp:34:23: fatal error: cublas_v2.h: No such file or directory
compilation terminated.
Makefile:591: recipe for target ‘.build_release/src/caffe/common.o’ failed
make: *** [.build_release/src/caffe/common.o] Error 1
root@jupiter:~/caffe#
撃沈!

Caffeのインストールその2

「参考2」を見ながら、再度インストール。

こちらはたくさんのパッケージの追加:
apt update && apt upgrade
apt install -y python python-pip python3-pip python-numpy python-scipy python-matplotlib ipython ipython-notebook python-pandas python-sympy python-nose python-tk python-yaml
apt install -y build-essential cmake git pkg-config libprotobuf-dev libleveldb-dev libsnappy-dev libhdf5-serial-dev protobuf-compiler libatlas-base-dev libgflags-dev libgoogle-glog-dev liblmdb-dev libhdf5-dev wget emacs vim gedit sudo
apt install -y –no-install-recommends libboost-all-dev
ここまで順調でしたが、
pip install —-upgrade pip
ここでエラーはたくさんでった!
Traceback (most recent call last):
  File "/usr/bin/pip", line 9, in <module>
    from pip import main
ImportError: cannot import name main
調べたら、「参考3」から、次の文を予め実行。
(予め alias pip=’python -m pip’)
これて続行できた。
pip install opencv-python scikit-image protobuf easydict cython
途中またエラーで進まない
    —————————————-
Command “python setup.py egg_info” failed with error code 1 in /tmp/pip-install-xUyVVw/ipython/
You are using pip version 18.0, however version 18.1 is available.
You should consider upgrading via the ‘pip install –upgrade pip’ command.
エラーの理由がわからないが、言われた通り再度、
$ pip install –upgrade pip
Looking in indexes: http://mirrors.cloud.aliyuncs.com/pypi/simple/
Requirement already up-to-date: pip in /usr/local/lib/python2.7/dist-packages (18.0)
You are using pip version 18.0, however version 18.1 is available.
You should consider upgrading via the ‘pip install –upgrade pip’ command.
すでにup-to-date、またconsider upgradingしろうと!何これ?わからん。

Caffeのインストールその3

2回目のインストールエラーを無視して、
Makefile.configを見直し、
「CPU_ONLY := 1」のように#を外してCPUを指定して。
再度makeする。
root@jupiter:~/caffe# vi Makefile.config
root@jupiter:~/caffe# make
CXX src/caffe/common.cpp
CXX src/caffe/net.cpp
src/caffe/net.cpp:9:18: fatal error: hdf5.h: No such file or directory
compilation terminated.
Makefile:591: recipe for target ‘.build_release/src/caffe/net.o’ failed
make: *** [.build_release/src/caffe/net.o] Error 1
root@jupiter:~/caffe#
こちらのエラーは、「参考1」に対策があるので、
——————————–
“can’t find hdf5.h”などと言われた場合は、
まずlibhdf5-devをapt-getしたか確認しましょう。
インストールされているのにエラーを吐く場合は、
Makefile.configのINCLUDE_DIRSを修正します。
caffe/Makefile.config
#INCLUDE_DIRS := $(PYTHON_INCLUDE) /usr/local/include /usr/include/hdf5/serial/
INCLUDE_DIRS := $(PYTHON_INCLUDE) /usr/local/include /usr/include/hdf5/serial/
——————————–
apt install libhdf5-dev
これて再度makeする
/usr/bin/ld: cannot find -lhdf5_hl
/usr/bin/ld: cannot find -lhdf5
collect2: error: ld returned 1 exit status
Makefile:582: recipe for target ‘.build_release/lib/libcaffe.so.1.0.0’ failed
make: *** [.build_release/lib/libcaffe.so.1.0.0] Error 1
root@jupiter:~/caffe#
またエラーが出る
こちらのエラーは、同じ「参考1」に対策があるので、
“/usr/bin/ld: -hdf5_hl が見つかりません”と言われたときは、
/usr/lib/x86_64-linux-gnuの中にシンボリックリンクを貼ります。
/usr/lib/x86_64-linux-gnu
$ cd /usr/lib/x86_64-linux-gnu
$ sudo ln -s libhdf5_serial.so.10.1.0 libhdf5.so
$ sudo ln -s libhdf5_serial_hl.so.10.0.2 libhdf5_hl.so
その通りして、ついにコンパイルがエラーなく終了。

RunTest

# make runtest
[———-] 1 test from SolverTest/0, where TypeParam = caffe::CPUDevice<float>
[ RUN      ] SolverTest/0.TestInitTrainTestNets
[       OK ] SolverTest/0.TestInitTrainTestNets (1 ms)
[———-] 1 test from SolverTest/0 (1 ms total)
[———-] Global test environment tear-down
[==========] 1162 tests from 152 test cases ran. (59829 ms total)
[  PASSED  ] 1162 tests.
root@jupiter:~/caffe#
ついに成功

参考

  1. https://qiita.com/toujika/items/1787a4b83826261c88ec — Caffeをインストールしてサンプルを動かすまで
  2. https://qiita.com/yoyoyo_/items/ed723a6e81c1f4046241 — Caffeをインストールしたった
  3. http://icchy.hatenablog.jp/entry/2018/04/17/064443 — pip install –upgrade pip (10.0.0) 後の奇妙な挙動について


Python(2) Pinterest API

Contents

目的

AI (機械学習)用の画像を取得しようと思ったら、意外に引っかかる。

PythonでPinterestの検索を行い、その結果の画像のURL等の情報を取得した。

Pinterest APIについては、検索ができるのは自分のアカウントのBoardとPinだけらしい。

Pinterest APIではすべてのPinを対象にしたい。

AI (機械学習)用の画像は、参考2のような、公開するデータセットを利用する方法もある。

コード

参考1のコードそのままだが

import os, sys, time
import requests
import json
import bs4 # beautifulSoupe4
import re  # for "findall"
 
# Save an image file
def save_image(file_name, image):
    with open(file_name, 'wb') as f:
        f.write(image)

def search(query, num_pins):
 
    # First access
    url     = 'https://www.pinterest.jp/search/pins/'
    headers = {
        'connection': 'keep-alive'
    }
 
    search_response = requests.get(url, params={'q':query}, headers=headers, stream=False)
    soup            = bs4.BeautifulSoup(search_response.text.replace('\n',''), 'html5lib')
 
    data_json_string = soup.find('script', type='application/json') # extract json string
    data_json        = json.loads(data_json_string.string) # convert into dictionary type variable
    results          = data_json['tree']['children'][0]['data']['results']
#    results          = data_json['resouceDataCache'][0]['children'][0]['data']['results']
 
    image_info_list  = []
    for r in results:
        image_info = {}
        image_info['description'] = r['description']
        image_info['link']        = r['link']
        image_info['image_url']   = r['images']['orig']['url']
        image_info['id']          = r['id']
        image_info_list.append(image_info)
 
 
    # Second or later access to load additional pins that are responded as a JSON string
    url             = 'https://www.pinterest.jp/resource/BaseSearchResource/get/'
    bookmarks       = data_json['resourceDataCache'][0]['resource']['options']['bookmarks']
    experiment_hash = data_json['context']['triggerable_experiments_hash']
    last_cookies    = search_response.cookies
 
    while len(image_info_list) < num_pins:
 
        ## Preparing parameters, headers and cookies for the "get" request
        params = {
            'source_url':'/search/pins/?q={}'.format(query),
            'data':json.dumps({
                'options':{
                    'bookmarks':bookmarks,
                    'query':query,
                    'scope':'pins',
                    'page_size':25,
                    'field_set_key':'unauth_react'
                },
                'context':{}}),
            '_':str(int(time.time())*10*10*10)
        }
 
        headers = {
            'Host':'www.pinterest.jp',
            'User-Agent':'Mozilla/5.0 (Windows NT 10.0; WOW64; rv:43.0) Gecko/20100101 Firefox/43.0',
            'Accept-Language':'ja,en-US;q=0.7,en;q=0.3',
            'X-Pinterest-AppState': 'background',
            'X-Pinterest-ExperimentHash': experiment_hash,
            'X-NEW-APP':'1',
            'X-APP-VERSION':'9b11f84',
            'X-Requested-With':'XMLHttpRequest',
            'Referer':'https://www.pinterest.jp',
            'cookie':json.dumps({
                '_auth':dict(last_cookies)['_auth'],
                'csrftoken':dict(last_cookies)['csrftoken'],
                '_pinterest_sess':dict(last_cookies)['_pinterest_sess']}),
            'connection':'keep-alive'
        }
 
        cookies = {
            '_auth':dict(last_cookies)['_auth'],
            'csrftoken':dict(last_cookies)['csrftoken'],
            '_pinterest_sess':dict(last_cookies)['_pinterest_sess'],
            'bei':'False',
            'logged_out':'True',
            'fba':'True',
            'sessionFunelEventLogged':'1'
        }
 
        search_response = requests.get(url, cookies=cookies, params=params, headers=headers, stream=False)
        data_json       = json.loads(search_response.text)
        results         = data_json['resource_response']['data']['results']
 
        bookmarks       = data_json['resource']['options']['bookmarks']
        experiment_hash = data_json['client_context']['triggerable_experiments_hash']
        last_cookies    = search_response.cookies
 
        for r in results:
            image_info = {}
            image_info['description'] = r['description']
            image_info['link']        = r['link']
            image_info['image_url']   = r['images']['orig']['url']
            image_info['id']          = r['id']
            image_info_list.append(image_info)
 
    return image_info_list
 
 
def main(argv):
    keyword  = 'xxx' # keyword you want to search
    num_pins = 100 # Number of pins searched
    img_dir  = 'images'
    timeout = 10 # in second
    params  = {} # not used
    cookies = {} # not used
    headers = {} # not used
 
    image_info_list = search(keyword, num_pins)

    for img_info in image_info_list:
  img_url = img_info['image_url']
        # Retrieve the file name of the image
        name_search = re.findall(r'\/([a-zA-Z0-9:.=_-]*jpg|jpeg|JPG|JPEG)', img_url)
        img_name    = name_search[0]
 
        # Get the content of the image
        img_response = requests.get(img_url, timeout=timeout, params=params, cookies=cookies, headers=headers, stream=False)
        if img_response.raise_for_status() != None:
            sys.exit('HTTP Error When Accessing The Image File!') # if not suceessed, this script will be terminated
 
        # Save the image
        save_image('./'+img_dir+'/'+img_name, img_response.content)
 
 
if __name__ == '__main__':
    main(sys.argv)

search関数に検索ワードと取得したい画像数をいれると、結果はimagesに保存される!

参考

  1. http://hassiweb-programming.blogspot.com/2017/07/retrieve-pinterest-pins-by-python.html — PythonでPinterestのPin (画像)の検索結果を取得する
  2. https://ai.google/tools/datasets/

Python(1) Install MySQL by Homebrew

Contents

MySQL をインストール

ローカルの環境(Mac)に MySQL をインストール

ChenLab-MacBookAir-3:~ chen$ brew install mysql
==> Installing dependencies for mysql: openssl
==> Installing mysql dependency: openssl
==> Downloading https://homebrew.bintray.com/bottles/openssl-1.0.2o_2.high_sierra.bottle.tar.gz
######################################################################## 100.0%
==> Pouring openssl-1.0.2o_2.high_sierra.bottle.tar.gz
==> Caveats
A CA file has been bootstrapped using certificates from the SystemRoots
keychain. To add additional certificates (e.g. the certificates added in
the System keychain), place .pem files in
/usr/local/etc/openssl/certs

and run
/usr/local/opt/openssl/bin/c_rehash

This formula is keg-only, which means it was not symlinked into /usr/local,
because Apple has deprecated use of OpenSSL in favor of its own TLS and crypto libraries.

If you need to have this software first in your PATH run:
echo ‘export PATH=”/usr/local/opt/openssl/bin:$PATH”‘ >> ~/.bash_profile

For compilers to find this software you may need to set:
LDFLAGS: -L/usr/local/opt/openssl/lib
CPPFLAGS: -I/usr/local/opt/openssl/include

==> Summary
? /usr/local/Cellar/openssl/1.0.2o_2: 1,792 files, 12.3MB
==> Installing mysql
==> Downloading https://homebrew.bintray.com/bottles/mysql-8.0.11.high_sierra.bottle.tar.gz
######################################################################## 100.0%
==> Pouring mysql-8.0.11.high_sierra.bottle.tar.gz
==> /usr/local/Cellar/mysql/8.0.11/bin/mysqld –initialize-insecure –user=chen –basedir=/usr/local/Cell
==> Caveats
We’ve installed your MySQL database without a root password. To secure it run:
mysql_secure_installation

MySQL is configured to only allow connections from localhost by default

To connect run:
mysql -uroot

To have launchd start mysql now and restart at login:
brew services start mysql
Or, if you don’t want/need a background service you can just run:
mysql.server start
==> Summary
? /usr/local/Cellar/mysql/8.0.11: 254 files, 232.6MB
ChenLab-MacBookAir-3:~ chen$

インストールが終わったら、内容を見てみる

ChenLab-MacBookAir-3:~ chen$ brew info mysql
mysql: stable 8.0.11 (bottled)
Open source relational database management system
https://dev.mysql.com/doc/refman/8.0/en/
Conflicts with:
mariadb (because mysql, mariadb, and percona install the same binaries.)
mariadb-connector-c (because both install plugins)
mysql-cluster (because mysql, mariadb, and percona install the same binaries.)
mysql-connector-c (because both install MySQL client libraries)
percona-server (because mysql, mariadb, and percona install the same binaries.)
/usr/local/Cellar/mysql/8.0.11 (254 files, 232.6MB) *
Poured from bottle on 2018-06-25 at 13:33:16
From: https://github.com/Homebrew/homebrew-core/blob/master/Formula/mysql.rb
==> Dependencies
Build: cmake ✘
Required: openssl ✔
==> Requirements
Required: macOS >= 10.10 ✔
==> Options
–with-debug
Build with debug support
–with-embedded
Build the embedded server
–with-local-infile
Build with local infile loading support
–with-memcached
Build with InnoDB Memcached plugin
–with-test
Build with unit tests
==> Caveats
We’ve installed your MySQL database without a root password. To secure it run:
mysql_secure_installation

MySQL is configured to only allow connections from localhost by default

To connect run:
mysql -uroot

To have launchd start mysql now and restart at login:
brew services start mysql
Or, if you don’t want/need a background service you can just run:
mysql.server start
ChenLab-MacBookAir-3:~ chen$

MySQL動作確認

MySQLを起動して動作確認する。付いてにテスト用のデータベースを用意しておく。

ChenLab-MacBookAir-3:~ chen$ mysql.server start
Starting MySQL
.. SUCCESS!
ChenLab-MacBookAir-3:~ chen$ $ mysql -uroot
-bash: $: command not found
ChenLab-MacBookAir-3:~ chen$ mysql -uroot
Welcome to the MySQL monitor. Commands end with ; or \g.
Your MySQL connection id is 8
Server version: 8.0.11 Homebrew

Copyright (c) 2000, 2018, Oracle and/or its affiliates. All rights reserved.

Oracle is a registered trademark of Oracle Corporation and/or its
affiliates. Other names may be trademarks of their respective
owners.

Type ‘help;’ or ‘\h’ for help. Type ‘\c’ to clear the current input statement.

mysql> CREATE DATABASE mysqltest DEFAULT CHARACTER SET utf8mb4;
Query OK, 1 row affected (0.01 sec)

mysql> CREATE USER hoge@localhost IDENTIFIED BY ‘password’;
Query OK, 0 rows affected (0.10 sec)

mysql> GRANT ALL ON mysqltest.* TO hoge@localhost;
Query OK, 0 rows affected (0.01 sec)

mysql> \q
Bye
ChenLab-MacBookAir-3:~ chen$

MySQLに接続するパッケージ

Python3でMySQLに接続する方法についてですが、mysqlclinetを使う方法がオススメらしい。さっそくpipでインストールしましょう。

pip install mysqlclient

しかしインストールがエラーで終わらなかった。違う方法で挑戦。

ChenLab-MacBookAir-3:work-Python chen$ pip install mysql-connector-python-rf
Collecting mysql-connector-python-rf
Downloading https://files.pythonhosted.org/packages/21/79/2ff01ab7aa08db3a16b70b990c579c1024c6b2a734263cc7513a758867de/mysql-connector-python-rf-2.2.2.tar.gz (11.9MB)
100% |████████████████████████████████| 11.9MB 777kB/s
Building wheels for collected packages: mysql-connector-python-rf
Running setup.py bdist_wheel for mysql-connector-python-rf … done
Stored in directory: /Users/chen/Library/Caches/pip/wheels/87/58/fb/d95c84fad7e1bebfed324c13e107ebb08e1997c9226532859a
Successfully built mysql-connector-python-rf
Installing collected packages: mysql-connector-python-rf
Successfully installed mysql-connector-python-rf-2.2.2
ChenLab-MacBookAir-3:work-Python chen$

ChenLab-MacBookAir-3:work-Python chen$ pip list
Package Version
————————- ——-
mysql-connector-python-rf 2.2.2
nose 1.3.7
numpy 1.14.3
pip 10.0.1
setuptools 39.1.0
TBB 0.1
wheel 0.31.0
ChenLab-MacBookAir-3:work-Python chen$

PythonからMySQLに接続

Pythonのプログラムは、上記で作成したデーターベースに「booklist」というテーブルを作成し、そこにPythonという本のデーターを追加するという内容だ。

# -*- coding: utf-8 -*-
#import MySQLdb
#
#conn = MySQLdb.connect(db='mysqltest',user='hoge',passwd='password',charset='utf8mb4')
import mysql.connector

conn = mysql.connector.connect(user='root', password='', host='localhost', database='mysqltest')
c = conn.cursor()
#tableが既にある場合は一回削除します
c.execute('DROP TABLE IF EXISTS booklist')
#tableを作成します
c.execute('''
    CREATE TABLE booklist(
      id integer,
      name text,
      kakaku integer
    )
''')
#tableにデータを入れます
c.execute('INSERT INTO booklist VALUES(%s,%s,%s)',(1,'Python',2400))
conn.commit()
c.execute('SELECT * FROM booklist')
for row in c.fetchall():
    print(row)
conn.close()

出力も短い一行だけ。

ChenLab-MacBookAir-3:work-Python chen$ python mysql-test.py
(1, u’Python’, 2400)


参考

Mac へ MySQL を Homebrew でインストールする手順

Beyond the IoT and cloud computing